Step 1. Setup
The biggest mistake beginners make when building a blog is choosing the wrong blogging platform. Thankfully you’re here, so you won’t be making that mistake.
For 95% of users, it makes more sense to use WordPress.org also known as self-hosted WordPress. Why?
Because it is free to use, you can install plugins, customize your blog design, and most importantly make money from your blog without any restrictions (see the difference between WordPress.com vs WordPress.org).
WordPress is also the number one website platform used by all successful blogs. To put in perspective, 34% of all websites on the internet use WordPress!
There’s no catch. It’s free because you have to do the setup and host it yourself.
In other words, you need a domain name and web hosting.
A domain name is what people type to get to your website. It’s your website’s address on the internet.
Web hosting is where your website files live. It’s your website’s house on the internet. Every website needs web hosting.
A domain name typically costs around $14.99 / year, and web hosting normally costs $7.99 / month.
That’s a lot of money for beginners who are just starting out.
→ Click here to Claim this Exclusive Priority Web Services offer ←
Let’s go ahead and purchase your domain + hosting.
First thing you need to do is click on the green Get Started Now button to get started.
On the next screen, select the plan that you need (basic and plus are the most popular).
After that, you will be asked to enter the domain name for your website.
Lastly, you will need to add your account information and finalize the package info to complete the process. We recommend going with the 36-month plan because that’s the best value.
On this screen, you will see optional extras that you can purchase. It’s entirely up to you whether or not you purchase these, but we generally don’t recommend purchasing them right away. You can always add them later on, if you decide that you need them.
Once completed, you will receive an email with details on how to login to your web hosting control panel (cPanel). This is where you manage everything from support, emails, among other things. But most importantly, this is where you install WordPress.
Step 2. Install WordPress
What this means is you simply need to login to your account, and then click the Login to WordPress button to get started.
You can also login to WordPress by simply going to yoursite.com/wp-admin/ directly from your browser.
If you are using a different WordPress blog hosting service like SiteGround, HostGator, WP Engine, etc, then you can see this comprehensive guide from wpbeginner on how to install WordPress for step by step instructions for those providers.
Once WordPress is setup, you’re ready to customize your blog’s appearance to make it your own and start blogging.
Step 3. Selecting Your WordPress Theme
The visual appearance of your WordPress blog is controlled by themes. When you first visit your blog, it will look something like this:

This is not very appealing to most people.
Customizing the look and feel of your blog is by far one of the most exciting and rewarding part in the journey of creating your WordPress blog.
There are thousands of pre-made WordPress themes that you can install on your site. Some of them are free themes, while others are paid.
You can change your theme by going to your WordPress dashboard and clicking on Appearance » Themes.

Go ahead and click on the Add New button.
On the next screen, you will able to search from 7,400+ free WordPress themes that are available in the official WordPress.org themes directory. You can sort by popular, latest, featured, as well as other feature filters (i.e industry, layout, etc).

You can take your mouse over to a theme, and you will see a Preview button. Clicking on it will open the theme preview where you can see how the design would look on your website.

The preview of your theme may not look exactly as shown in the screenshot, which is normal as you will get to customize and set it up later. What you need to look for is design, colors, typography, and other elements.
The best tip to select the perfect WordPress theme is to strive for simplicity in design. It helps you keep things clean and clear while offering a good experience to your users.
When you have found the theme that you like, simply bring your mouse on it, and it will show the Install button. Click on it and wait for the theme to be installed. After that, the install button will be replaced with an Activate button. You need to click on it to Activate the theme.
Once you have installed your theme, you can customize it by clicking on the Customize link under the Appearance menu.
Once you have selected your WordPress theme, you are now ready to create your first blog post.
Step 4. Go ahead and write your first blog post
Now that you learned how to create a WordPress blog, you’re probably excited to get to blogging!
We’ll show you how to change how your blog looks and functions in a second. But first, let’s go over just how easy it is to write a blog post on your new website.
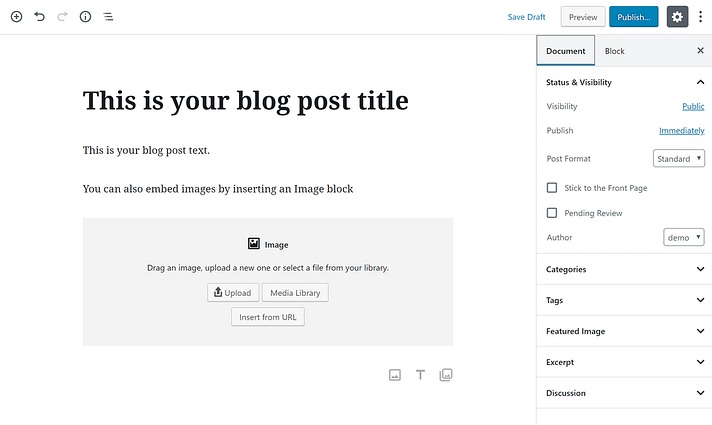
When you first log in to your blog’s WordPress dashboard, you should see a screen like this:

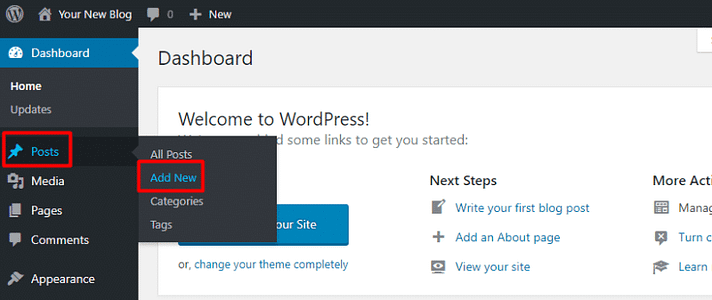
To write a blog post:
- Hover over Posts
- Click Add New
This will launch the WordPress Editor, which lets you write your blog posts using a really intuitive block system.
To add text, you just click and type. For other content – like an image or an embedded YouTube video, you can add new “blocks”.